Abstract sculpture making
- Jui-Yi Hsu
- 2022年5月23日
- 讀畢需時 3 分鐘

已更新:2022年9月10日
Design
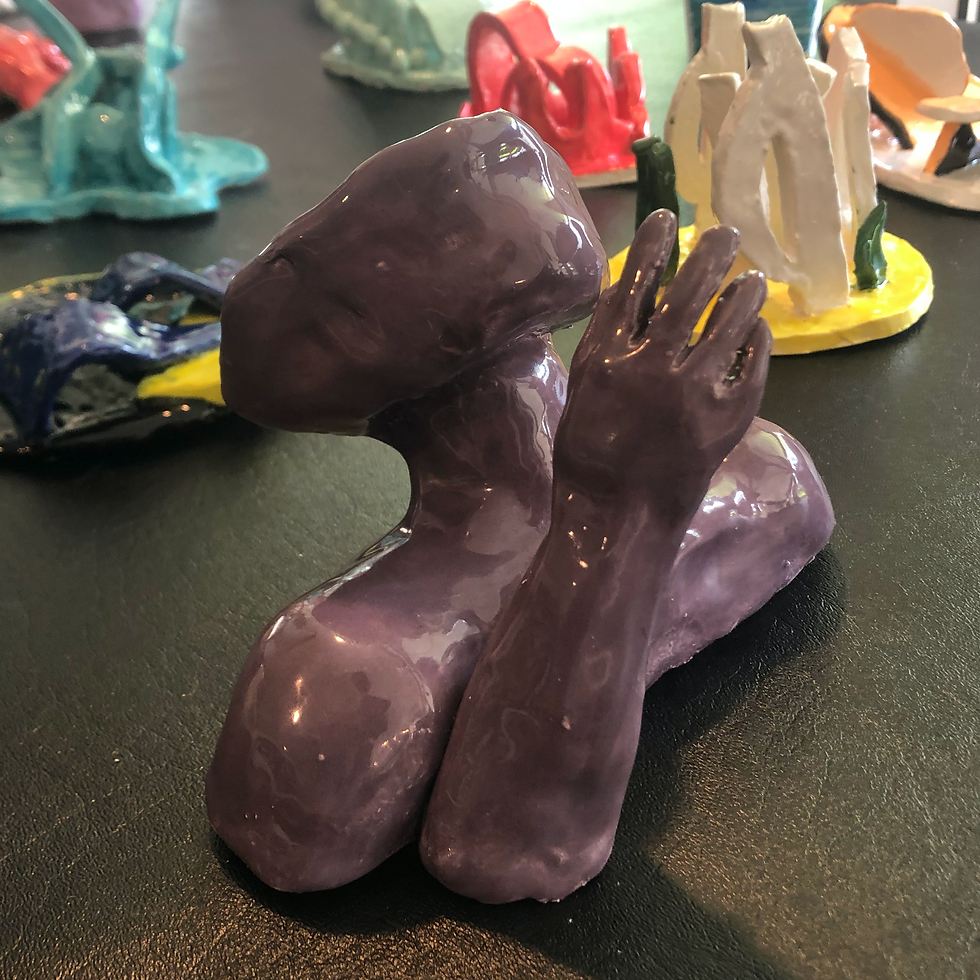
The project is focused on multi-dimensional exploration, by switching the 2-dimensional photo that I took into 3-dimensional ceramic sculpture. First of all, I scrutinized the photo and decided to make the model's upper body with her hands.
After that, I imagined the picture in my head in order to have an idea of the entire sculpture looked, I tried to draw the sculpture from different angles in the sketchbook.
This is when the difficulty came out, the problem is the pose of the hands, it’s more complicated because the fingers are crossed together. I couldn't imagine a picture of the back angle of my hands, To solve that, I did the same pose as the model and took a picture of my hands all around.


In the sketchbook, I separated the sculpture into geometry. Such as the head, neck, arms, and hands. The head is a sphere, the neck, and arms are cylinders and the chest with shoulders are rectangular cuboid
Using geometry it’s helping me to have a 3-dimensional concept in my head. So I can see the sculpture from different angles. Like in the picture of the sketchbook, I set the front, back top, and back by using geometry.


After drawing from different angles I have completed the picture in my head.
I start to think to make it more abstract because the limited of time I knew that I don’t have time to do it too realistic.
Also, I decided to make it abstract in order to send the message that the photo wants to send which is sadness and powerlessness. Due to the media, I can make the message stronger, so I wanted to make the seems broken which can emphasize the idea of powerless or even inanition.
I think about what is the sculpture's function, I want the sculpture to have more applications than watching by itself. I come up with two ideas one is a candle stand and another is a vase.
Because the thickness of the clay that will be taken to the kiln later cannot exceed 2 cm, the sculpture must be hollow, and I want to make it useful.
Process of clay making

Took a piece of clay and wedged clay to make sure there is no air bubble in the clay.
After that, I shape it into a rectangular cuboid which is what I planned in the sketchbook and used a wire tool to make a hollow in the bottom and the part that will be connected to the neck

I made the neck by shaping it into a cylinder that had hollow on the top and the bottom then I use my finger to smear evenly in order to make them stick together.
After the shoulder and neck, I made the jaw of the head and also use my finger get wet to smear it evenly

I made one hand and stick them together.
The hand took me most of the time because it is so little, every finger needs to use a needle to smear evenly and during that process, the control of force need to be carful to avoid it cut off.
Connect to the arm I poke holes at the bottom of the arm.
Then keep the sculpture in the storage to wait to dry and put it into the kiln.

After the kiln, I move to the step which is glazing.
I want the color dark purple but the glaze doesn’t have the color that I wanted so I mixed it with violet, red, blue, and black. I don’t have any experience with toning glaze so the color will come up sort of depending on my luck.


I decided to glaze it into a single color. To match the tone with all of my previous works.
The is the final cook, the color came out really well, is dark purple and the texture is also very evenly and smooth and doesn’t have bulges.
And can be seen from any angle the top of the sculpture has a hollow I wanted the sculpture to be a vase or candle stand, so I also glazed inside the hollow.


留言